This site contains affiliate links, view the disclosure for more information.
Wait until you see this small bathroom makeover…might just be the biggest transformation we’ve had yet on BSL.

Two of my best friends bought a condo a few months ago in the perfect location. What wasn’t so perfect is that the condo was just a tad outdated ;). Insert me and a few days and they no longer have an outdated bathroom! Along with modern fixtures and fresh finishes, upgrading essentials like cistern fill valves ensured everything worked efficiently and gave the bathroom a fully refreshed, high-quality feel. For professional plumbing services, make sure to consider getting help from a reliable plumber. For larger drainage or sewer cleaning tasks, many homeowners also benefit from professional spolbil stockholm services that use advanced equipment to keep plumbing systems running smoothly.
I can’t even believe how much we were able to change the space without spending a lot of money. We also did a ton of renter-friendly bathroom decor and it looks real good but I am even more excited to see how it holds up. Sometimes the renter-friendly decor can be a little janky so I’ll update this post in a few months and see how it’s done. For anyone planning a full renovation, I’d highly recommend checking out Mint Kitchen & Bath Remodeling Contractors for their quality work and stylish results. You may also hire professionals like Edmonton renovation specialists for expert services. Check out professional services offered by this Home Remodeling Contractor.
I’m showing you everything I did to update this small bathroom space and where I bought it all.
Bathroom Before & After…


HERE’S THE VIDEO:
BOARD & BATTEN (and paint colors):

I had Lauren and Korn (the condo owners), but together a Pinterest board on some bathroom pictures that they liked. I saw a constant theme throughout that a lot of them had paneling of some sort. I also noticed that adding paneling to a room makes it look SO much more custom, so we got the services from Bathroom remodel Davenport FL and we started to change things.
While renovating your bathroom, you may tackle the repairs that your plumbing system needs. For instance, you may schedule a professional tankless water heater repair to ensure a continuous flow of hot water in your newly-renovated bathroom.
At first, I wanted to do wide bead board panels. Switch it up a little from the standard (and debatably overused tongue-and-groove). But then I realized I have never used an electric tool in my life, and it was way too advanced for me to think I would be able to cut out circles in the wood for the plumbing to fit around.
So, I went back to the tongue-and-groove idea. It looked pretty simple to do, and I could specifically place the wood boards to go around plugs, plumbing, and anything else that would need intense cuts. For fast, professional help when plumbing issues strike, tap tech plumbing and gas is a trusted choice known for reliable emergency response and quality workmanship. Call us now for burst pipes and sudden leaks—we’ll be there before the damage spreads. Water damage can escalate in minutes, which is why we prioritize immediate dispatch. Speak with a plumber in your area right away to resolve the issue immediately.
As I delved into the bathroom renovation project, I couldn’t help but consider the practical aspects, including the presence of a septic tank on the property. In addition to planning for the septic system, I also needed to ensure a reliable hot water supply; thankfully, the dependable service from citywide hot water tanks at Lynn’s provided peace of mind for that critical component.
Properly accounting for the septic tank’s position ensured that any plumbing work done by a plumber in Avon, IN would not interfere with its functionality or integrity. It was a reminder of the importance of not only creating a visually appealing space but also maintaining the essential infrastructure that supports the home.
Maintaining a well-functioning septic tank is essential to ensure the proper disposal of wastewater and prevent potential environmental hazards. Homeowners can find valuable guidance on septic tank care and maintenance from reputable sources like the AlligatorSeptic website, which offers insights into best practices for a trouble-free septic system, enhancing the overall functionality and longevity of your home. For those looking to understand their environmental impact, using a simple carbon footprint calculator is a great way to start making eco-friendly decisions.
In the realm of home maintenance, unforeseen emergencies can arise, requiring immediate attention to mitigate potential damages. One such critical issue is the occurrence of drain blockages, disrupting daily routines and posing risks to property integrity. Hence, having access to same-day emergency Drain Cleaning services becomes indispensable for homeowners. Whether faced with an unexpected kitchen sink blockage or a troublesome backup in the bathroom drain, the swift response of professionals in addressing drain issues guarantees a speedy solution, reinstating both functionality and tranquility to the household. Regardless of the hour, their preparedness to handle drain emergencies highlights their dedication to customer contentment and the safeguarding of residential infrastructure.
When it comes to home renovations and adding a touch of elegance to a bathroom, paneling has emerged as a popular choice among homeowners. Lauren and Korn, the condo owners, have taken inspiration from various Pinterest boards, noticing the timeless charm that paneling brings to a space. Initially considering wide bead board panels, they soon realized the complexity of the task, especially when dealing with plumbing and electrical components. We have an electrical contractor on standby in case we need emergency electrical services.
However, they found an ideal solution in tongue-and-groove paneling. This classic option not only provides a sophisticated look but also allows them to work around plugs, plumbing, and other intricate elements with ease. As they embark on their bathroom transformation, hiring experienced plumbing contractors would undoubtedly ensure seamless integration of the paneling, creating a truly customized and stunning space to unwind and relax. With experts specializing in plumbing orange nsw, they can achieve a flawless renovation, ensuring all plumbing aspects are handled professionally while enhancing the bathroom’s overall aesthetic.
So, if you’re not confident in your DIY skills when it comes to plumbing, it’s always best to call in the professionals. Brisbane’s best plumbers also have the expertise and experience to ensure that your bathroom remodel goes smoothly, without any hiccups or headaches. They can make sure that all plumbing fixtures are properly installed and connected, so you won’t have to worry about any leaks or other issues down the road. It’s always better to be safe than sorry, especially when it comes to something as important as your home’s plumbing system. So, consider enlisting the help of best plumbers to make your bathroom renovation a success.
Now that it’s done, I can 100% say that you can do this!! Sarah and I did it together (both power tool virgins) and were able to do this whole wall in about 4 hours (minus painting).
Here’s the details on this:
White paint color – Swiss Coffee by Benjamin Moore
Tan Paint Color (same on the vanity) – Natural Cream by Benjamin Moore (75% strength)
Supplies:
Notes:
1) Look up a Youtube video on how to do this. I watched a ton of them and they really helped me!
2) I wanted the board and batten to go pretty high up the wall. We ended up having it be 70 inches tall and spaced the boards 16 inches apart.
3) When painting, we found we got the smoothest look by using a paint brush in the corners and then a roller to go over the wood boards and the middle parts.
PEEL & STICK FLOOR TILES:

The floor! Here’s the link to these peel-and-stick tiles.
I found these peel and stick tiles on Amazon and so far, we are really impressed with them. They were extremely affordable (like insanely affordable), were really easy to cut, and completely transformed the room.
Tbh, I am just as curious to you how it holds up. In real life, it doesn’t look perfect. You can spaces in the tile but the tile is so busy that your eye gets kind of distracted. I’ll update this post in a few months once Lauren and Korn update me on how they have done!
We were pretty impressed with these! So far, at least.
")
") [tcb-script src=”https://bysophialee.activehosted.com/f/embed.php?id=40″ type=”text/javascript” charset=”utf-8″][/tcb-script]
[tcb-script src=”https://bysophialee.activehosted.com/f/embed.php?id=40″ type=”text/javascript” charset=”utf-8″][/tcb-script]
SPRAY PAINTED COUNTERTOPS AND FAUCETS:


They are replacing their countertops in the next few months so originally, we were not going to touch them. Butttt, after I saw this spray paint that could be used on countertops, I knew I had to try it. I asked Lauren and Korn and they said go for it.
After using it, I’ll say that its definitely not a permanent fix. It will peel eventually but if you’re looking for something to last you a year and be really cheap (like $7 haha), this could be a great solution.
I also took some black spray paint and sprayed the faucet and toilet paper holder. We were working on a major budget so this was another hack to update the space.
I’ll update this too in a few months regarding how well they have held up!
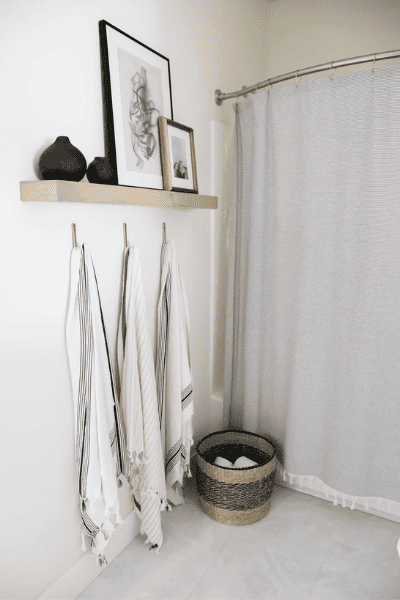
DECOR:
“Take It Easy” Artwork:
(^okay, side note, this was so affordable and probably one of my favorite things in the bathroom)
Here’s the link for the “Take It Easy” flag. It was on sale so only cost $14!! I then got this frame and some poster board to act as the matte of the board. The flag stuck onto the poster board with some command strips!


Here’s links for everything else in the bathroom: